Whirlpool microwave repair knowledge is essential if you are facing issues with your appliance, as microwave ovens have become indispensable tools in our modern kitchens, providing convenience and speed in meal preparation. Among the various brands available, Whirlpool is known for its reliability and innovative features. However, even the most dependable microwaves can encounter problems, particularly with their heating functionality. Understanding the underlying causes and repair methods is key to resolving these issues.
Before diving into the repair process, it is crucial to prioritize safety and ensure you have the right tools and knowledge. Microwaves operate at high voltages and can pose significant risks if not handled properly. This guide aims to provide step-by-step instructions for troubleshooting and repairing your Whirlpool microwave’s heating power, ensuring you can do so safely and effectively.
In the following sections, we will explore common issues that can lead to a lack of heating, such as malfunctioning components and electrical failures. Additionally, we will outline safety precautions you should take, essential tools you’ll need, and detailed procedures for diagnosing and fixing the problem. By the end of this guide, you will be equipped with the knowledge necessary to restore your microwave’s heating capabilities and extend its lifespan.

Whirlpool Microwave Repair: How to Restore Heating Power Safely
Restoring heating power to your Whirlpool microwave requires careful troubleshooting and a methodical approach. Begin by ensuring the microwave is unplugged to avoid electrical hazards while you investigate the issue.
First, check the power source. Ensure the microwave is properly plugged into a working outlet. You can test the outlet with another device to confirm it’s providing power. If the outlet is functioning, inspect the microwave’s power cord for any visible damage or fraying.
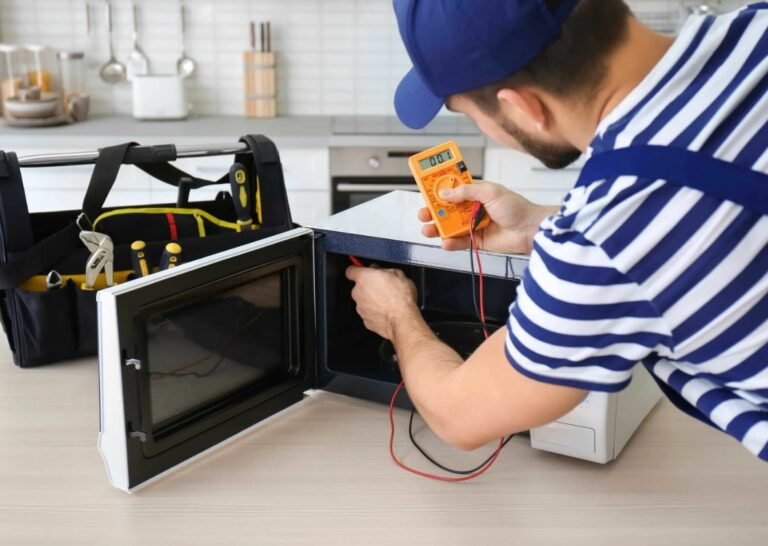
If power seems adequate, focus on the door switch mechanisms. Microwaves are designed with safety features that prevent operation if the door is not securely closed. Inspect the door latch and switches for proper alignment and functionality. Use a multimeter to test the continuity of the door switches; replace any faulty components.
Next, examine the internal components, specifically the magnetron, which is crucial for heating. Signs of malfunction include buzzing noises or a burnt smell. Testing the magnetron with a multimeter will help determine if it needs replacement. Additionally, check the high-voltage capacitor, which stores electricity and can be dangerous if mishandled. Always discharge the capacitor before attempting any repairs.
Another critical component is the high-voltage transformer. Inspect for signs of damage, such as overheating or burnt wires. Replacement may be necessary if it fails continuity testing.
Once repairs or replacements are made, reassemble the microwave and plug it back in. Conduct a safety test by heating a cup of water for 1-2 minutes. Monitor closely to confirm the microwave heats effectively. If issues persist, consult a professional technician for further assistance.
Remember to prioritize safety throughout the repair process. Wear appropriate protective gear and use insulated tools. If you are uncertain about any step, it’s advisable to seek help from a qualified appliance repair technician.
Identifying Symptoms of Heating Problems
Identifying heating problems in your Whirlpool microwave is crucial for effective troubleshooting and repair. Recognizing the early signs can prevent further damage and ensure safe operation.
Common symptoms of heating issues include:
- Food Not Heating: If the microwave operates but your food remains cold, it indicates a problem with energy transfer or magnetron failure.
- Uneven Heating: When certain areas of your food are hot while others are cold, the microwave may have a malfunctioning turntable or a defective distribution system.
- Strange Noises: Unusual sounds during operation, such as buzzing or humming, can suggest mechanical issues or failing components.
- Burning Smell: A burnt odor may indicate overheating components, exposing serious hazards if not addressed promptly.
- Display Errors: Error codes or warning lights on the control panel could signal operational failures and should be noted for troubleshooting.
To ensure accurate diagnosis, observe the microwave during operation and take note of these symptoms. Early detection leads to safer and more efficient repair processes.
Gathering Necessary Tools for Repair
Before undertaking the repair of your Whirlpool microwave, it’s crucial to assemble the right tools to ensure a smooth process. Having the appropriate tools not only facilitates effective repairs but also enhances safety. Below is a list of essential tools you’ll need.
Basic Tools
Start with a basic toolkit comprising the following items:
- Screwdriver Set: A set of both flathead and Phillips screwdrivers is necessary to remove the outer casing and access internal components.
- Nut Drivers: These are useful for loosening and tightening various types of nuts commonly found in microwave assembly.
- Pliers: Having a pair of needle-nose and regular pliers can help manipulate wires and reach tight spaces.
Safety Equipment
Safety should always come first when handling electrical appliances. Ensure you have:
- Insulated Gloves: These will protect you from electric shock while working on the microwave.
- Safety Goggles: Wear goggles to shield your eyes from dust and potential debris during the repair process.
- Multimeter: This device is essential for testing voltage and ensuring that all electrical components are functioning correctly before reassembly.
Collecting these tools prior to starting your microwave repair will make the process more streamlined, allowing you to focus on restoring the heating power effectively and safely.
Unplugging the Microwave for Safety
Before beginning any repair work on your Whirlpool microwave, it’s crucial to ensure your safety. The first step in this process is to unplug the microwave. Disconnecting the appliance from the power source eliminates the risk of electrical shock and prevents unintentional activation while you are working on it.
Why Is Unplugging Necessary?
Microwaves operate using high voltages, and even a small electrical fault can lead to hazardous situations. Unplugging your microwave removes the power supply completely, safeguarding you from any potential shocks during the repair process. Additionally, some components, like capacitors, can store electrical energy even after the microwave is disconnected. By unplugging it, you reduce the risk of injury from these stored charges.
How to Unplug Safely
To unplug the microwave safely, locate the power cord, which is usually positioned at the back or side of the unit. Gently pull the cord out from the wall outlet without yanking or pulling on the cord itself, as this could damage the wiring. Ensure that your hands are dry, as moisture can increase the risk of electrical shock.
Once unplugged, it is advisable to wait a few minutes before proceeding with repairs. This allows any remaining charge in components to dissipate. Always keep the power cord away from the appliance while you work, to avoid accidentally reconnecting it.
By prioritizing this step, you lay the groundwork for a safe and efficient repair of your Whirlpool microwave.
Inspecting the Power Cord for Damage
The power cord is a critical component of your Whirlpool microwave, as it supplies the necessary electricity for operation. Inspecting the power cord for damage is an essential step in troubleshooting heating power issues.
Signs of Damage
- Fraying or Cracking: Look for any signs of wear such as frayed ends or visible cracks along the insulation. These can compromise safety and functionality.
- Discoloration: Noticeable discoloration, particularly dark or burnt spots, may indicate overheating or electrical short circuits.
- Exposed Wires: If you can see any exposed wires, the cord should be replaced immediately to avoid electrical shock hazards.
- Breaks or Kinks: Physical breaks or kinks in the cord can also lead to power interruptions. Gently bend the cord in various places to check for internal breaks.
Steps for Inspection
- Unplug the Microwave: Always disconnect the appliance from the power source before inspecting the power cord to ensure safety.
- Visual Examination: Conduct a thorough visual check from the plug to where the cord enters the microwave. Ensure to inspect the entire length.
- Feel for Heat: If the cord feels unusually warm while plugged in, it may indicate internal damage, requiring further investigation or replacement.
- Test for Continuity: Use a multimeter to check for continuity in the cord. No continuity may indicate a break in the wiring.
If any damage is detected during your inspection, promptly replace the power cord or seek professional repair services to maintain safety and functionality of your Whirlpool microwave.

Testing the Door Switch Mechanism
The door switch mechanism in a Whirlpool microwave plays a crucial role in ensuring the appliance operates safely. If the microwave fails to heat, one of the first components to check is the door switch. This switch ensures that the microwave stops operating when the door is opened, preventing hazards. To test the door switch, follow these steps:
Begin by unplugging the microwave to ensure safety during the process. Remove the outer casing to access the door switch. The switch is typically located near the door latch and can be identified by its wire connections.
Using a multimeter set to the continuity testing mode, disconnect the wires from the door switch terminals. Place the multimeter probes on the terminals of the switch. When the switch is pressed, the multimeter should indicate continuity, meaning a circuit is complete. If there is no continuity when the switch is engaged, the switch may be faulty and requires replacement.
Next, check the connection points and wires for any signs of damage, wear, or corrosion. Broken or frayed wires can also prevent the switch from functioning correctly. Ensure all connections are secure before reassembling the microwave.
After testing and, if necessary, replacing the switch, reassemble the microwave and plug it back in. Test the microwave by closing the door and starting a heating cycle. If the microwave heats as expected, the door switch mechanism has been successfully restored. If issues persist, further testing of other components may be required.
Always consult the user manual for specific guidance tailored to your Whirlpool microwave model and follow safety practices when performing repairs.
Examining the High-Voltage Capacitor
The high-voltage capacitor is a critical component in Whirlpool microwaves, responsible for storing and releasing electrical energy necessary for powering the magnetron, which produces microwave radiation. Understanding its function and safe handling is essential for effective repair and restoration of heating power in your microwave.
Function of the High-Voltage Capacitor
The high-voltage capacitor works in conjunction with the transformer to convert lower voltages into the necessary higher voltage required for the magnetron. It temporarily stores this high voltage and releases it in bursts to initiate the microwave heating process. If the capacitor fails, it may lead to insufficient heating or complete loss of power. Common signs of capacitor failure include strange noises, burnt smells, or visible damage to the casing.
Safety Precautions and Testing
Before examining or replacing the high-voltage capacitor, always unplug the microwave and allow it to discharge properly. High-voltage capacitors can hold a substantial electrical charge, posing serious shock hazards. Use an insulated screwdriver to short the terminals of the capacitor, ensuring any residual charge is safely dissipated. When testing the capacitor, a multimeter set to the capacitance setting can determine if it’s functioning correctly. Replace the component if readings fall outside the recommended specifications outlined in the microwave’s service manual.
Checking the Magnetron for Malfunctions
The magnetron is a critical component in a microwave oven, responsible for generating the microwave radiation that heats food. If your Whirlpool microwave is not heating, the magnetron may be malfunctioning. Here’s a step-by-step guide to checking for issues.
- Safety First: Unplug the microwave from the power source. This ensures safety while working on the appliance.
- Access the Magnetron: Remove the outer casing of the microwave. Typically, this involves unscrewing several screws and carefully lifting off the metal cover.
- Locate the Magnetron: Identify the magnetron, which is usually a rectangular or cylindrical metal component connected to the waveguide.
- Visual Inspection: Examine the magnetron for physical signs of damage such as burns, cracks, or corrosion. If any visible damage is present, the magnetron likely needs replacement.
- Check Connections: Ensure all wiring and connectors leading to the magnetron are secure and undamaged. Loose or frayed wires can contribute to malfunction.
If the visual inspection does not reveal obvious issues, further testing is necessary:
- Using a Multimeter: Set a multimeter to measure resistance. Disconnect the magnetron from the circuit for an accurate reading.
- Measure Resistance: Check the terminals of the magnetron. A reading of zero indicates a short circuit, while infinite resistance suggests a break in the magnetron.
- Capacitance Testing: If your multimeter has this function, you can also perform a capacitance test to ensure the magnetron operates within the required specifications.
After these checks, if the magnetron shows signs of malfunction, consider replacing it. If you are unsure or uncomfortable with the process, consulting a professional technician is advisable to avoid safety hazards and further damage to the microwave.

Assessing the Diode Functionality
When diagnosing heating issues in a Whirlpool microwave, one critical component to evaluate is the diode. The diode is responsible for converting AC (alternating current) to DC (direct current), which powers the magnetron and generates microwave energy. A faulty diode can lead to a loss of heating power, causing the appliance to underperform.
To assess the functionality of the microwave diode, you will need a multimeter set to the diode testing mode. Begin by unplugging the microwave to ensure safety. Open the cabinet and locate the diode, usually found near the capacitor and magnetron. Carefully disconnect the diode from the microwave circuit.
With the diode removed, connect the multimeter probes to the diode terminals. A functioning diode should show a low resistance reading in one direction (forward bias) and a high resistance reading in the opposite direction (reverse bias). If the multimeter indicates continuity in both directions or shows an infinite resistance in both directions, the diode is defective and requires replacement.
It is essential to handle the diode with care to avoid damage and ensure accurate measurements. After testing, if the diode needs replacement, ensure you use a compatible component rated for your specific microwave model. Once replaced, reassemble the microwave, plug it back in, and test for heating functionality.
Verifying the Fuse Condition
When a Whirlpool microwave stops heating, one of the first components to check is the fuse. A blown fuse is a common issue that can disrupt the microwave’s heating functionality. Verifying the condition of the fuse requires adherence to safety protocols, as it involves accessing the internal components of the microwave.
Tools Needed
To verify the fuse condition, you will need a few tools: a multimeter, a screwdriver, and protective gloves. The multimeter will help you test the continuity of the fuse, while the screwdriver is necessary to remove the microwave’s outer casing.
Steps for Verification
1. Disconnect Power: Before beginning any repairs, ensure the microwave is unplugged from the power source to prevent electric shock.
2. Remove the Outer Casing: Using a screwdriver, carefully unscrew and remove the outer casing of the microwave. This process may involve removing screws from the back and sides. Take note of the screws’ locations for easy reassembly.
3. Locate the Fuse: The fuse is typically found near the primary power supply or the control panel. Refer to the user manual for specific details about your model’s fuse location.
4. Remove the Fuse: Gently pull the fuse out of its holder. Be careful not to damage any surrounding components during this process.
5. Test the Fuse: Set your multimeter to the continuity test mode. Touch the probes to each end of the fuse. If the multimeter beeps or shows a reading close to zero, the fuse is intact. If there is no beep or the reading is infinite, the fuse is blown.
6. Replace if Necessary: If the fuse is blown, replace it with a new fuse that matches the specifications required for your microwave. Refer to the user manual or the existing fuse for the correct rating.
7. Reassemble the Microwave: After replacing the fuse, carefully reattach the outer casing and secure it with the screws. Ensure no wires are pinched or improperly positioned during reassembly.
8. Reconnect Power**: Plug the microwave back into the power source and test its functionality. If the heating power is restored, the issue was likely the blown fuse.
By systematically verifying the fuse condition, you can efficiently diagnose and potentially fix heating issues in your Whirlpool microwave. Always remember to prioritize safety during these steps.
Understanding the Control Board Circuit
The control board circuit in a Whirlpool microwave is a critical component that enables the appliance to function properly. It manages all operations, including power levels, cooking times, and user interface settings. Understanding the control board circuit is essential for diagnosing and repairing issues related to heating power.
Typically, the control board contains various electronic components, such as microprocessors, resistors, capacitors, and connectors, which work together to control the microwave’s functions. The microprocessor processes input from the user interface, while other components ensure stable operation and perform the necessary calculations for effective cooking.
| Component | Function |
|---|---|
| Microprocessor | Processes user commands and controls the microwave’s operations. |
| Resistors | Limit the flow of electric current, ensuring proper voltage levels. |
| Capacitors | Store and release electrical energy, stabilizing voltage fluctuations. |
| Connectors | Facilitate connections between the control board and other components, such as the magnetron and power supply. |
When troubleshooting heating power issues, start by inspecting the control board for any visible signs of damage, such as burned components or broken circuits. A multimeter can be employed to test the functionality of individual components, allowing for precise identification of faults.
Be cautious when handling the control board, as the microwave holds residual voltage even after it has been unplugged. It is advisable to discharge the capacitor safely before performing any repairs to avoid electrical shock.
Understanding the control board circuit empowers users to carry out effective repairs, ensuring the microwave operates efficiently and safely. If the damage appears extensive or beyond basic repair, seeking professional assistance is recommended to maintain proper safety standards.
Reassembling Components After Inspection
Once you have completed the inspection and maintenance of your Whirlpool microwave, it is crucial to properly reassemble the components to ensure safe and effective operation. Follow these steps for successful reassembly:
- Gather All Components:Ensure you have all parts and screws collected from the inspection. This includes the microwave casing, fan, waveguide cover, and any other components that were removed.
- Organize Your Workspace:Work in a clean, well-lit area to prevent losing any small parts. An organized workspace helps prevent confusion when reassembling components.
- Consult the User Manual:Refer to the user manual or repair guide for your specific model. This will assist you in identifying the correct order and placement of components.
- Reinsert Components:Begin reattaching components in the reverse order that they were removed. Start with internal parts, such as the waveguide cover and fan, before moving to the outer casing.
- Secure with Screws:Use the appropriate screws and tools to secure each component tightly. Ensure screws are not over-tightened to avoid damage to the parts.
- Reconnect Wiring:Carefully reconnect any wiring harnesses or connectors. Ensure that all connections are firm and that wires are routed correctly to avoid interference with moving parts.
- Perform a Final Inspection:Before closing the microwave casing, do a final check to ensure all components are securely attached and that there are no stray screws or parts.
- Close the Casing:Once everything looks in order, attach the outer casing. Ensure all latches and screws are properly aligned and fastened.
- Conduct a Test Run:After reassembly, plug the microwave back in and conduct a test run. Monitor for any unusual noises or malfunctions during operation.
By following these steps, you can safely reassemble your Whirlpool microwave after inspection, ensuring it operates effectively and reliably.
Conducting a Test Run After Repairs
After completing repairs on your Whirlpool microwave, it is crucial to conduct a test run to ensure that the heating power has been successfully restored. This process helps to verify that all components are functioning properly and that the microwave is safe for regular use.
Before starting the test, ensure that the microwave is plugged in and positioned correctly. Make sure to remove any food particles or debris from the interior to ensure accurate testing. Also, take note of any previous issues, such as specific functionality loss or unusual noises, which you will want to watch for during the test.
The following steps outline a simple procedure for conducting a test run:
| Step | Description |
|---|---|
| 1 | Place a microwave-safe container filled with water inside the microwave. This will help gauge its heating performance. |
| 2 | Set the microwave to a medium power setting. Choose a time duration of about 1-2 minutes for initial testing. |
| 3 | Start the microwave and listen for any unusual noises. Pay attention to the operation of the turntable and the fan. |
| 4 | After the timer goes off, carefully check the temperature of the water. It should be warm to hot. If the water has not heated significantly, further investigation and repair may be necessary. |
| 5 | Observe any error codes displayed on the control panel. Refer to the user manual to interpret these codes and address any specific issues. |
After completing the test run and ensuring that the microwave is functioning correctly, allow it to cool down. Inspect the exterior for any signs of damage or overheating. If everything checks out, your Whirlpool microwave is ready for use again. Remember to keep an eye on its performance over the next few uses, as some issues may not present themselves immediately.
Q&A — Whirlpool microwave repair:
What are the common signs that indicate my Whirlpool microwave needs repair?
Common signs that your Whirlpool microwave may need repair include a complete lack of heating power, unusual noises during operation, burning smells, and a malfunctioning control panel. If your food isn’t heating evenly or takes longer to cook than it used to, these may also indicate a problem. Pay attention to any error codes displayed, as they can provide guidance on the specific issue.
How can I safely diagnose the heating issue in my Whirlpool microwave?
To diagnose the heating issue safely, first, unplug the microwave to prevent any electrical accidents. Check for visible issues like damaged power cords or loose connections. After that, use a multimeter to test the magnetron, diodes, and thermal fuse if you have experience with electrical components. If you’re not comfortable with this level of inspection, it’s best to consult a professional technician who is familiar with microwave repairs.
What components should I inspect during the microwave repair process?
During the repair process, inspect several key components: the magnetron, which generates the microwave energy; the high voltage diode, which converts AC to DC; the thermal fuse, which protects the microwave from overheating; and the door switch, which ensures the microwave operates only when the door is closed. Each of these parts plays a crucial role in the functioning of the microwave, and issues with any of them can lead to heating problems.
Is it safe to repair a microwave myself, or should I hire a professional?
Repairing a microwave can be risky due to the high voltages present inside. If you have experience with electrical repairs and feel confident in your skills, you may attempt the repair. However, if you’re unsure or inexperienced, hiring a professional is advisable. Microwaves can contain dangerous components, and a technician will have the proper tools and knowledge to handle repairs safely.
What precautions should I take before attempting any repairs on my Whirlpool microwave?
Before attempting any repairs, make sure to unplug the microwave to ensure your safety. Wear rubber-soled shoes and work in a dry environment. Have safety goggles on hand to protect your eyes from any debris or sparks. If you’re disassembling the microwave, keep track of all screws and parts to ensure you can reassemble it later correctly. Always consult the user manual for specific guidance on your model.
What are the primary reasons my Whirlpool microwave stopped heating?
There are several reasons why your Whirlpool microwave may have stopped heating. One common issue is a malfunctioning magnetron, which is the component that generates microwave energy. Another possibility is a blown fuse or a malfunctioned high-voltage capacitor, both of which can interrupt the heating process. Additionally, faulty door switches or connections might prevent the microwave from heating, as the appliance won’t operate if it senses that the door is not securely closed. If you suspect any of these issues, it’s best to troubleshoot accordingly and, if necessary, consult a professional technician for repairs.
Looking for trusted APPLIANCE REPAIR in San Jose for you? Our certified technicians offer fast, affordable, and reliable fixes for all your home appliances — because your time and comfort matter most!