Refrigeration Repair is often required because, like any mechanical device, these essential systems can experience issues that demand timely attention. Refrigeration systems are essential appliances in modern households, ensuring food safety and comfort through temperature control. Understanding the basics of repair can empower homeowners to identify problems, perform minor fixes, and know exactly when to call a professional technician.
This guide aims to provide a comprehensive overview of common refrigeration problems, troubleshooting techniques, and maintenance tips. Homeowners will benefit from learning about the components of their refrigeration unit, typical signs of malfunction, and preventative measures to extend the lifespan of their appliance. With this knowledge, addressing refrigeration issues can become a less daunting task.
From faulty thermostats to refrigerant leaks, refrigeration failures can manifest in various forms. Identifying the underlying cause is crucial for effective repair, enabling homeowners to potentially save on costly repair bills. This guide will demystify the repair process and equip homeowners with the necessary tools and information to tackle refrigeration problems with confidence.

Identifying Common Refrigerator Issues
Refrigerators are essential appliances in any home, but they can encounter various problems over time. Recognizing these issues early can save you time and money on repairs. Below are some common refrigerator problems and their symptoms.
1. Refrigerator Not Cooling: If your refrigerator is not adequately cooling, the first step is to check if it’s receiving power. Verify that the power cord is plugged in and that the circuit breaker hasn’t tripped. If power is stable, inspect the thermostat settings and ensure they are set correctly. A malfunctioning compressor or a clogged condenser coil may also lead to cooling issues.
2. Excessive Noise: Refrigerators usually operate quietly, but unusual noises can indicate a problem. Listen for loud sounds such as grinding, buzzing, or rattling. These may stem from a failing compressor, a faulty fan, or items rattling inside the appliance. If the noise persists, consult a technician for further investigation.
3. Water Leakage: Puddles of water around the refrigerator can be caused by a blocked defrost drain, damaged door seals, or a malfunctioning water filter. Check if the defrost drain is clear and inspect the door seals for any cracks or gaps that might allow condensation to form. Regular maintenance can help prevent this issue.
4. Ice Build-Up: Ice accumulation in the freezer is often a clear indicator of a problem. Frost may develop if the door is left open for too long or if the door seals are damaged. However, a more serious issue like a malfunctioning defrost heater or a faulty thermostat could also be the cause. Regularly defrosting the freezer can help alleviate build-up but does not address the root issue.
5. Bad Odors: Unpleasant smells in your refrigerator may result from spoiled food, spills, or a dirty interior. Cleaning the shelves and inspecting food items can often resolve the issue. If odors persist, consider replacing the refrigerator’s air filter if available or using baking soda to neutralize smells.
6. Door Won’t Close Properly: A refrigerator door that won’t seal can lead to temperature fluctuations inside the appliance. Check for obstructions inside the door and ensure the refrigerator is level. Damaged door gaskets are also a common cause and may need replacement to restore an effective seal.
Regular maintenance and immediate attention to these common issues can prolong the life of your refrigerator. Always refer to the manufacturer’s manual for specific troubleshooting tips. If problems persist, consult with a professional technician to identify and resolve the issues effectively.
Understanding the Components of Your Refrigerator
Refrigerators are complex appliances that rely on several key components to maintain optimal cooling and preservation of food. Understanding these components can help homeowners troubleshoot issues and ensure their refrigerator operates efficiently.
Here are the main components of a refrigerator:
- Compressor: The compressor is often referred to as the heart of the refrigerator. It compresses refrigerant and circulates it through the system, producing heat and facilitating the cooling process.
- Condenser Coils: Located at the back or bottom of the refrigerator, condenser coils expel heat from the refrigerant. The heat exchange process helps in maintaining the temperature within the fridge.
- Evaporator Coils: Found inside the refrigerator compartment, these coils absorb heat from the interior, allowing the refrigerant to cool down as it evaporates into gas.
- Expansion Valve: This component regulates the flow of refrigerant into the evaporator coils. It helps in maintaining the correct pressure and temperature for efficient cooling.
- Thermostat: The thermostat senses the internal temperature and controls the operation of the compressor by turning it on or off as needed to maintain the desired temperature.
- Fans: Refrigerators usually have two main fans: one for the evaporator and one for the condenser. The evaporator fan circulates cool air inside the fridge, while the condenser fan cools the compressor and condenser coils.
- Defrost Heater: This component is responsible for melting any frost that accumulates on the evaporator coils. A build-up of frost can inhibit airflow and reduce cooling efficiency.
- Drip Pan: This pan collects excess water that results from the defrost cycle. Proper drainage is essential to prevent water accumulation and potential leaks.
Familiarity with these components enables homeowners to recognize potential issues and manage basic repairs or maintenance tasks, such as cleaning coils and checking seals. Regular maintenance is crucial for preserving the lifespan and efficiency of your refrigerator.
Troubleshooting Temperature Problems
When your refrigerator or freezer is not maintaining the correct temperature, it can lead to food spoilage and other issues. Here are steps to troubleshoot temperature problems effectively.
First, check the thermostat settings. Ensure that the thermostat is set to the appropriate temperature, typically around 37°F (3°C) for the refrigerator and 0°F (-18°C) for the freezer. Make adjustments if necessary.
Inspect the door seals for any gaps or tears. Damaged seals can allow warm air to enter, hindering the appliance’s ability to maintain the proper temperature. Clean the seals with warm, soapy water and check for wear; replace them if they are damaged.
Examine the condenser coils. Dust and debris buildup on the coils can restrict airflow and reduce cooling efficiency. Locate the coils, usually found at the back or underneath the unit, and clean them thoroughly with a vacuum or brush.
Ensure that there is adequate airflow inside the refrigerator. Overcrowding can block vents, preventing cold air from circulating. Organize the contents to allow for proper airflow and maintain ideal temperatures.
Check the evaporator fan. This fan circulates cold air throughout the refrigerator and freezer. If it is not functioning, you may notice uneven temperatures. Listen for unusual noises or a lack of airflow near vents, indicating a fan malfunction that may require repair or replacement.
Test the compressor for functionality. The compressor is the heart of the refrigeration process. If it is not running or cycles on and off frequently, there may be an electrical issue or a need for expertise from a repair technician.
Inspect the defrost system. If frost builds up on the evaporator coils, it can block airflow and disrupt cooling. If your model has a defrost timer, ensure it is operating correctly, as a malfunctioning timer may require replacement.
If none of these steps resolve the temperature issues, consider calling a professional technician. Complex problems involving refrigerant levels or serious mechanical failures require specialized knowledge and tools to diagnose and repair effectively.

Fixing a Noisy Refrigerator
A noisy refrigerator can be a common annoyance for homeowners. Identifying the source of the noise is crucial to determining the appropriate fix. Below are steps and checks to help resolve the issue.
Common causes of noise include:
- Vibrations: Ensure the refrigerator is level. Adjust the feet to eliminate any wobbling.
- Fan Issues: Check the evaporator and condenser fans for any obstructions or damage. Clean the blades and ensure they spin freely.
- Compressor Noise: A functioning compressor will emit some sound. However, loud clanking or buzzing may indicate a problem. In this case, consider consulting a professional.
- Defrost Timer: Clicking sounds could be related to the defrost timer cycle. This is usually normal, but if it’s persistent, it may need replacement.
Steps to troubleshoot:
- First, clear any items that may be touching the refrigerator, leading to additional noise.
- Next, unplug the unit and inspect the back panel for dust accumulation. Clean it to improve airflow.
- Listen closely to identify the specific noise type: rattling, buzzing, or humming.
- If the noise persists, it may be time to check internal components. Open the refrigerator and freezer compartments to identify which section produces sound.
Preventative measures include:
- Regularly clean the condenser coils to prevent noise caused by poor circulation.
- Keep the refrigerator organized; ensure items are not blocking vents.
- Check door seals to prevent air leaks, enhancing overall efficiency and reducing noise.
If troubleshooting does not resolve the noise, consider seeking the assistance of a certified technician for a thorough examination. Early intervention can prevent further damage and extend the life of your refrigerator.
Dealing with Leaking Water in Your Fridge
Experiencing water leakage from your refrigerator can be frustrating. Ignoring the issue may lead to damage or mold growth. Here are common causes and solutions for water leaks.
First, check the water supply line if your fridge has a water dispenser or ice maker. A damaged, kinked, or loose connection can cause leaks. Inspect the line for any visible cracks or wear. If necessary, replace the damaged section or tighten the connection.
Next, examine the drain pan located at the bottom of the fridge. This pan collects condensation and should be periodically emptied and cleaned. If the pan is cracked or misaligned, it may overflow, resulting in water pooling beneath the appliance.
The defrost drain is another critical area to check. Over time, debris or ice can clog the drain, causing water to back up and leak into the main compartment. Clear any obstructions by using warm water or a flexible cleaning brush. Ensure that the drain line is free-flowing and unobstructed.
Additionally, inspect door seals. Worn or damaged gaskets can allow warm air to enter the fridge, leading to excess condensation. Clean the seals and check for any tears or gaps. If damaged, replace the seals to ensure a proper fit.
For built-in ice makers, inspect the ice bin and ensure it is properly seated. If the bin is overflowing, adjust it according to manufacturer instructions or replace it if damaged.
If these solutions do not resolve the leak, it may indicate a more serious issue, such as a faulty water inlet valve or internal plumbing problem. In such cases, contacting a professional technician for further assessment is advisable.
| Cause | Solution |
|---|---|
| Damaged water supply line | Inspect and replace if necessary. |
| Overflowing drain pan | Empty and clean the drain pan. |
| Clogged defrost drain | Clear any blockages using warm water. |
| Worn door seals | Clean or replace gaskets. |
| Overflowing ice bin | Adjust or replace ice bin as needed. |
By following these troubleshooting tips, you can effectively manage and resolve water leakage in your refrigerator, ensuring it operates efficiently and maintains a safe environment for your food.
Addressing Electrical Issues in Refrigeration
Refrigerators rely heavily on electrical components to function efficiently. When issues arise, they can lead to improper cooling, excessive energy consumption, or even complete breakdowns. Identifying and addressing these electrical concerns promptly is crucial for maintaining your refrigerator’s performance.
Common electrical issues in refrigeration include faulty electrical connections, blown fuses, and malfunctioning thermostats. Begin by checking the power supply. Ensure that the refrigerator is plugged in securely and that the outlet is functioning. Use a multimeter to test the voltage at the outlet, ensuring it meets the manufacturer’s specifications.
If the refrigerator is receiving power but not cooling, the problem may lie with the compressor or start capacitor. Listen for clicking sounds from the compressor, which can indicate it’s trying to start but failing. A technician can check and replace a faulty start capacitor if needed.
Thermostats control the temperature by regulating power to the compressor. A malfunctioning thermostat can result in improper cooling. Test the thermostat by adjusting it to different temperature settings, and listen for the compressor to respond. If there is no response, consider replacing the thermostat unit.
Another critical factor is the defrost timer, which allows the unit to periodically defrost. A faulty timer can cause ice buildup, leading to poor cooling performance. If ice accumulates on the evaporator coils, the defrost timer should be inspected and replaced if defective.
Electrical wiring within the refrigerator can also become damaged over time. Look for signs of fraying or corrosion, which may cause short circuits. If you suspect damaged wiring, it is essential to consult a professional, as handling electrical components requires expertise.
Lastly, regularly maintain your refrigerator by cleaning the coils and ensuring proper airflow. This practice can prevent overheating of electrical components and prolong the lifespan of the appliance.

Cleaning Coils: Why It Matters
Cleaning the coils of your refrigerator is an essential maintenance task that can have a significant impact on its efficiency, longevity, and overall performance. Both the condenser and evaporator coils play critical roles in the refrigeration process, and neglecting them can lead to various issues.
Importance of Clean Coils
- Energy Efficiency: Dirty coils force the refrigerator to work harder, consuming more energy. This increased workload can lead to higher electricity bills.
- Enhanced Cooling Performance: Clean coils facilitate better heat exchange, ensuring that your refrigerator maintains optimal temperatures, keeping food fresher for longer.
- Increased Lifespan: Regular cleaning minimizes wear and tear on the compressor and other components, extending the life of your appliance.
- Prevention of Breakdown: Accumulation of dirt and debris can lead to overheating and potential breakdowns, resulting in costly repairs or replacements.
How Often to Clean Coils
Ideally, you should clean your refrigerator coils at least twice a year. However, depending on your environment–such as homes with pets or high dust levels–you may need to perform this task more frequently. An easy way to keep track is to schedule it during seasonal changes.
By prioritizing the cleaning of refrigerator coils, homeowners can ensure their appliance operates smoothly, efficiently, and reliably for many years. Simple maintenance can make all the difference in preserving your unit’s performance and saving on energy costs.
Replacing Refrigerator Door Seals
The door seals of your refrigerator play a critical role in maintaining its energy efficiency and keeping your food fresh. Over time, these seals can wear out, leading to temperature fluctuations and increased energy costs. Replacing the door seals is a straightforward process that any homeowner can manage with some basic tools and patience.
Identifying Issues with Door Seals
Begin by checking your refrigerator’s door seals for visible signs of wear, such as cracks, tears, or discoloration. A simple test involves placing a piece of paper between the seal and the door; if you can easily pull it out without resistance, the seal may need to be replaced. Additionally, look for excessive condensation or ice buildup inside the refrigerator, which can indicate airflow issues caused by a faulty seal.
Steps to Replace Door Seals
To replace the door seals, first, buy the appropriate seal for your refrigerator model. The exact measurements can typically be found in your appliance’s manual or by contacting the manufacturer. Start by removing the damaged seal by pulling it away from the door. In some models, you may need to unscrew the seal from the frame. Clean the area where the new seal will be applied to ensure it adheres properly. Align the new seal with the frame, pressing it into place, and secure it if necessary. Finally, perform a check to ensure the door closes tightly and there are no gaps.
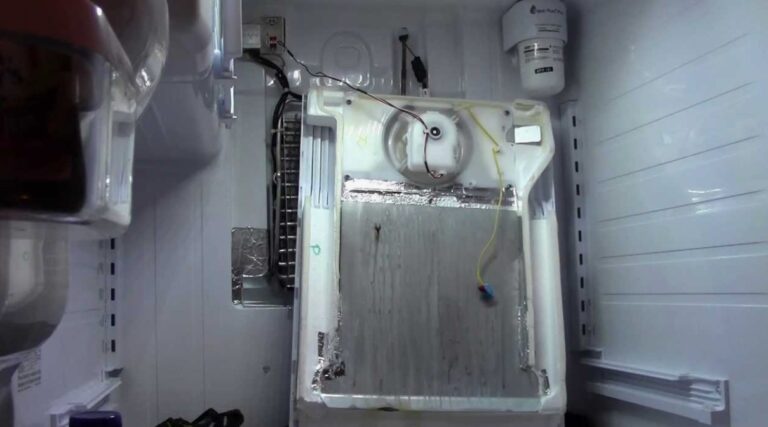
Diagnosing and Fixing Ice Buildup
Ice buildup in your refrigerator can lead to inefficiencies, spoilage, and even component failure. Understanding its causes is essential for effective repair. Here’s a structured approach to diagnosing and fixing ice buildup.
Common Causes of Ice Buildup
Several factors can lead to excessive ice accumulation in your refrigerator. These include:
| Cause | Description |
|---|---|
| Poor Door Seals | Frayed or damaged door gaskets allow warm air to enter, causing condensation and ice formation. |
| Blocked Vents | Obstructions can hinder airflow and cause areas to freeze, trapping cold air within. |
| Defrost Timer Failure | A malfunctioning defrost timer can prevent the automatic defrost cycle, leading to frost build-up. |
| Freon Leaks | Low refrigerant levels due to leaks can impact the cooling cycle and promote ice accumulation. |
| Thermostat Issues | A faulty thermostat might cause excessive cooling, leading to frost development. |
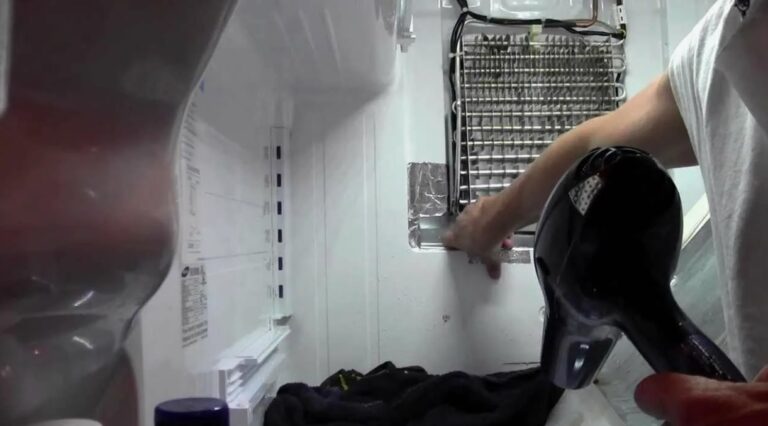
Steps to Fix Ice Buildup
Once you identify the cause of ice buildup, follow these steps to resolve the issue:
1. Inspect Door Seals: Check for any visible damage to the door gaskets. Clean them with warm, soapy water and replace if necessary.
2. Clear Vents: Ensure that air vents are unobstructed by food items. Rearrange contents if needed to promote proper airflow.
3. Test the Defrost Timer: Manually advance the timer to trigger the defrost cycle. If it doesn’t work correctly, consider replacing it.
4. Check Refrigerant Levels: If you suspect a leak, consult a professional technician to restore the appropriate refrigerant levels.
5. Replace the Thermostat: Use a multimeter to test the thermostatic control. If it’s faulty, replace it with a compatible unit.
Following these troubleshooting steps will help maintain optimal performance in your refrigerator and prevent future ice buildup issues.
Checking and Replacing the Fridge Light Bulb
The refrigerator light bulb is essential for visibility inside the fridge. If the light fails to turn on when the door is opened, it may be time to check and replace the bulb. Follow these steps to ensure proper replacement and safety during the process.
Checking the Light Bulb
Before assuming the bulb needs replacement, first verify that it truly is the source of the problem. Begin by opening the fridge door and observing whether the light emits any glow. If the light is completely out, try the following:
- Ensure the refrigerator is plugged in and operational.
- Check the door switch, which turns the light on and off when the door opens and closes. If this switch is stuck or malfunctioning, the light may not activate.
- Inspect the bulb for any visible signs of damage or burnouts, such as a broken filament.
If the light still does not work after these checks, it is likely that the bulb needs replacing.
Replacing the Light Bulb
To replace the refrigerator light bulb, follow these simple steps:
- Unplug the refrigerator to ensure safety during the replacement process.
- Locate the light bulb cover; it typically snaps or screws off. Use a flathead screwdriver if necessary to gently pry it off.
- Carefully unscrew the old bulb and dispose of it properly.
- Select a new bulb. Use a bulb that is compatible with your fridge model (usually a refrigerator-specific LED or incandescent bulb). Refer to the owner’s manual for specifications.
- Screw in the new bulb and replace the cover securely.
- Plug in the refrigerator and test the new bulb by opening the door to ensure it lights up as expected.
Proper maintenance of the fridge light ensures better visibility and improves the overall convenience when accessing food items. Regularly check the bulb and replace it as needed to maintain optimal functionality.
Understanding Refrigerant Recovery and Charging
Refrigerant recovery and charging are critical processes in refrigeration repair. Proper handling of refrigerants ensures the efficiency, safety, and longevity of HVAC systems. Understanding these concepts is essential for any homeowner facing potential repairs.
Refrigerant Recovery
Refrigerant recovery involves the safe removal of refrigerant from a cooling system. This process is essential when servicing or disposing of old units to prevent harm to the environment and comply with legal regulations. To recover refrigerant, technicians use specialized equipment called recovery machines, which efficiently extract refrigerant while preventing leaks.
Before starting the recovery process, it is crucial to check for leaks and ensure the system is not under pressure. After ensuring safe conditions, the technician connects the recovery machine to the system’s service valves and activates it to remove the refrigerant. This collected refrigerant must then be stored in certified recovery tanks for proper recycling or disposal.
Refrigerant Charging
Charging a refrigeration system refers to the process of adding refrigerant to restore optimal performance. Undercharging or overcharging can lead to inefficiency, increased energy costs, and potential system damage. Homeowners should monitor performance indicators such as cooling efficiency to identify issues that may require refrigerant charging.
To charge a system, technicians first determine the appropriate type and amount of refrigerant needed, which is usually specified on the unit’s nameplate. After ensuring the system is off, they connect gauge manifolds to the service ports, allowing for precise measurement of the refrigerant levels. They can then add the necessary amount of refrigerant, continuously monitoring pressure readings to ensure the system operates within specified parameters.
Understanding refrigerant recovery and charging will prepare homeowners for effective communication with repair technicians and ensure they can identify signs of refrigerant-related issues in their refrigeration systems.
Knowing When to Call a Professional
Refrigeration systems can encounter various issues, and while some minor problems can be addressed by homeowners, others require the expertise of a professional technician. Understanding when to reach out for help is crucial to avoiding further damage and ensuring the longevity of your unit.
Signs You Need Professional Help
Here are some indicators that suggest it’s time to call a professional:
- Unusual Noises: If you hear loud banging, hissing, or rattling sounds coming from your refrigerator, it could indicate loose components or failing parts.
- Frost Build-up: Excessive frost accumulation in the freezer section can mean issues with the defrost system, which require specialized knowledge to repair.
- Warm Air Output: If your refrigerator is not keeping items cool and you notice warm air inside, it may indicate a refrigerant leak or compressor failure.
- Water Leaks: Puddles of water around the fridge can stem from blocked defrost drains or damaged internal components, necessitating professional assessment.
- Electrical Issues: Frequent tripping of circuit breakers or burning smells point to serious electrical problems that require immediate professional intervention.
Benefits of Hiring a Professional
Engaging a professional technician offers several advantages:
- Expertise: Professionals have the training and experience necessary to quickly diagnose and fix complex issues.
- Safety: Refrigeration systems contain harmful components (like refrigerants) and electrical circuits. Professionals handle these safely.
- Long-Term Solution: Professional repairs often come with warranties, providing peace of mind and ensuring the issue is resolved properly.
- Efficiency: Technicians have access to specialized tools and equipment that homeowners typically do not have.
Recognizing the signs of a failing refrigeration unit and understanding the benefits of professional repair can save you time, money, and hassle in the long run. When in doubt, it’s wise to consult a professional to address your refrigeration needs.
Q&A — Refrigeration Repair:
What are the most common issues that can occur with refrigerators?
Refrigerators can experience a variety of issues. Common problems include the appliance not cooling properly, strange noises coming from the unit, water pooling inside or around the fridge, and issues with the ice maker if your model has one. Each of these problems can stem from different causes, such as dirty coils, faulty thermostats, or even door seals that are not functioning correctly.
How can I troubleshoot my refrigerator before calling a repair technician?
To troubleshoot your refrigerator, start by checking the power supply. Ensure the appliance is plugged in and that the outlet is functioning. Next, inspect the temperature settings; they should typically be set between 37°F and 40°F for the refrigerator and 0°F for the freezer. If the fridge is not cooling, check the condenser coils for dust or debris and clean them if necessary. Also, look for any blockages in the vents inside the fridge that may restrict airflow. If you’ve gone through these steps and the problem persists, it may be time to contact a repair technician.
What regular maintenance should I perform to keep my refrigerator in good condition?
Regular maintenance for your refrigerator includes cleaning the condenser coils every six months to a year to ensure efficient operation. Additionally, check and replace door seals if they are worn out, as this can prevent cold air from escaping. Keeping the interior clean and ensuring that vents are unobstructed will help maintain proper airflow and temperature. Lastly, monitor the temperature settings regularly and defrost the freezer if frost buildup becomes excessive.
Can I fix a coolant leak in my refrigerator myself, or should I hire a professional?
Fixing a coolant leak is a complex task that typically requires professional expertise. Refrigerant is under pressure and handling it improperly can be dangerous, not to mention that specific tools and knowledge are necessary to repair leaks safely. If you suspect a coolant leak, it is best to contact a licensed technician who can diagnose and repair the issue while ensuring compliance with safety regulations.
What should I do if my refrigerator is making a loud noise?
If your refrigerator is making unusual or loud noises, start by identifying the source of the sound. Common causes of noise can include a malfunctioning fan, a clogged drain pan, or even the compressor. First, check if the noise is coming from the back or the inside of the fridge. If it’s from the fan, cleaning or replacing it may resolve the issue. If the noise persists, it’s advisable to consult a repair technician to diagnose the problem accurately and make any necessary repairs.
How can I tell if my refrigerator needs repair?
There are several signs that indicate your refrigerator may need attention. If you notice that your refrigerator is not cooling properly, or if there are unusual noises coming from it, these are strong indicators of potential issues. Additionally, check for excessive condensation or frost buildup, which can signal a problem with the door seals or the defrost system. If your electric bill has suddenly increased, it could also mean that your refrigerator is working harder than it should due to inefficiencies. If you’re experiencing any of these issues, it’s advisable to consult a repair technician.
What are some common refrigerator problems that homeowners might face?
Homeowners can encounter various problems with their refrigerators, and some of the most common include temperature inconsistencies, where food is either too warm or too cold; having a malfunctioning ice maker; and experiencing leakage puddles from the base. Another frequent issue is a faulty thermostat, which can affect the cooling cycles. Additionally, strange noises, often caused by the compressor or fan, can indicate mechanical issues. Regular maintenance can help prevent some of these problems, but being aware of them can save you time and money on repairs.
Don’t let broken appliances disrupt your life — trust expert Appliance Repair services for fast, reliable fixes that get your home back on track today!