Maytag Refrigerator Repair Guide provides you with the essential knowledge needed to troubleshoot and repair common problems, saving you time and money if your appliance encounters issues over time. If you own a Maytag refrigerator, you likely rely on it to keep your food fresh and your drinks cold. Understanding how to diagnose and resolve various issues can ensure your refrigerator operates efficiently. This detailed advice is structured to help you minimize downtime with your appliance.
From temperature fluctuations to unusual noises, the problems can range from minor annoyances to significant malfunctions. Being proactive about maintenance and repairs can extend the lifespan of your appliance and improve its performance. In this guide, we will cover essential tips for identifying common signs of trouble and provide step-by-step instructions for making repairs yourself when possible.
Before diving into specific repairs, it is crucial to understand the components of your Maytag refrigerator. Knowing how each part functions will aid in accurately diagnosing problems. Additionally, we recommend having the appropriate tools and safety gear on hand before starting any repair work. With the right preparation and knowledge, you can confidently tackle many repairs yourself, ensuring your Maytag refrigerator continues to serve you well for years to come.

Troubleshooting Common Cooling Issues
If your Maytag refrigerator is not cooling properly, there are several potential issues that can be easily diagnosed and resolved. This guide will help you identify common cooling problems and offer practical solutions.
1. Check the Temperature Settings
Begin by verifying that the temperature settings are correctly configured. The recommended temperature for the refrigerator is between 35°F to 38°F (1.5°C to 3.3°C). Adjust the thermostat if necessary and allow 24 hours for the temperature to stabilize. If the temperature remains inconsistent, further troubleshooting is required.
2. Inspect the Door Seals
A faulty door seal can lead to cool air escaping, causing the refrigerator to struggle to maintain the desired temperature. To check the seals, close the refrigerator door on a piece of paper. If you can easily pull the paper out with little resistance, the seal may need replacement. Ensure that the seals are clean and free of debris to enhance their effectiveness.
Additionally, examine the hinges for any signs of damage which could prevent the door from sealing properly.
3. Clean the Condenser Coils
Dirty condenser coils can significantly reduce the cooling efficiency of your refrigerator. Located at the back or beneath the unit, these coils should be cleaned regularly. Use a vacuum cleaner or a coil cleaning brush to remove dust and debris. Once cleaned, ensure good airflow around the refrigerator to improve cooling performance.
4. Check for Obstructions
Ensure that the refrigerator has enough space around it for proper ventilation. Items placed too close to vents can restrict airflow, impacting cooling. Rearrange any items blocking vents or causing obstructions, and maintain a space of at least a few inches between the refrigerator and surrounding walls.
5. Examine the Evaporator Fan
The evaporator fan assists in distributing cool air throughout the refrigerator and freezer compartments. If you notice a significant temperature difference between these areas, the evaporator fan may be malfunctioning. Listen for unusual noises that could indicate a problem. If it’s not working correctly, consult your repair manual for instructions on how to access and test the fan, or consider contacting a technician for help.
Following these troubleshooting steps can help identify and resolve common cooling issues in your Maytag refrigerator. If problems persist, professional diagnosis and repair may be necessary to restore optimal performance.
Fixing a Noisy Maytag Refrigerator
When your Maytag refrigerator starts making unusual sounds, it can be concerning. Identifying the source of the noise is the first step in addressing the issue. Common sounds include rattling, buzzing, hissing, and humming.
Rattling noises often stem from loose components or items placed on top of the refrigerator. Check for any items that may be vibrating and secure them. Additionally, inspect the condenser coils, as debris can cause vibrations if they’re loose or if the appliance is unevenly positioned.
Buzzing noises typically arise from the compressor or fan. The compressor may hum during regular operation, but if it becomes excessively loud, it could indicate a problem. For fan issues, listen for clicking sounds; this can imply that the fan blades are obstructed. Remove any obstructions and clean the fan to ensure it operates smoothly.
Hissing sounds may come from refrigerant flow or defrosting. If the noise persists or increases, it might indicate a refrigerant leak, requiring professional service. Monitor the refrigerator’s cooling efficiency to assess any significant changes.
A constant humming noise is often normal, especially if the refrigerator is cycling. However, if it becomes louder, check the evaporator fan motor. If it’s malfunctioning, it may need replacement. Ensure that the interior fan is functioning properly, as well as that no food items are blocking airflow within the refrigerator.
Another potential cause of noise is the water supply line. If your Maytag refrigerator is equipped with a water dispenser or ice maker, inspect the water supply line for kinks or obstructions. A malfunctioning water valve can also produce noise that may need replacement.
In some cases, noise may result from the refrigerator’s normal operational cycle. Keep in mind that some sounds are not abnormal; however, drastic changes should be investigated. Regular maintenance, such as cleaning condenser coils and leveling the refrigerator, can help minimize noise.
If you’ve checked these potential causes and the noise continues, it may be best to contact a qualified technician for a thorough diagnosis and repair.

Replacing a Broken Refrigerator Door Seal
A broken refrigerator door seal compromises energy efficiency and temperature control, leading to spoiled food and higher electricity bills. Replacing the seal is a straightforward process that can be completed with minimal tools and materials.
First, begin by purchasing a replacement door seal suitable for your Maytag refrigerator model. Ensure it matches the dimensions and specifications of the existing seal. You can usually find this information in the user manual or by checking the manufacturer’s website.
Once you have the new seal, unplug the refrigerator to ensure safety while working. Carefully remove the old seal by pulling it away from the door. In some cases, it may be secured with screws or adhesive. If there are screws, use a screwdriver to remove them, and if it’s adhesive, gently pry it off using a plastic scraper to avoid damaging the door surface.
Next, clean the area where the seal was attached. Remove any debris, dirt, or old adhesive using a damp cloth. This step is crucial for ensuring a secure fit for the new seal.
Now, position the new seal onto the door, ensuring it aligns properly with the grooves. Start from one corner and work your way around, pressing the seal firmly into place. If applicable, reinsert any screws to secure the seal, or press down firmly to ensure the adhesive sticks well.
After the new seal is installed, close the refrigerator door to check for a tight fit. You should not feel cold air escaping or see any gaps. If needed, adjust the seal slightly until it fits snugly.
Finally, plug the refrigerator back in and allow it to reach the desired temperature. Monitor the appliance over the next few days to ensure the new seal is functioning properly. Regularly inspecting the door seals can prolong their lifespan and maintain efficient operation.
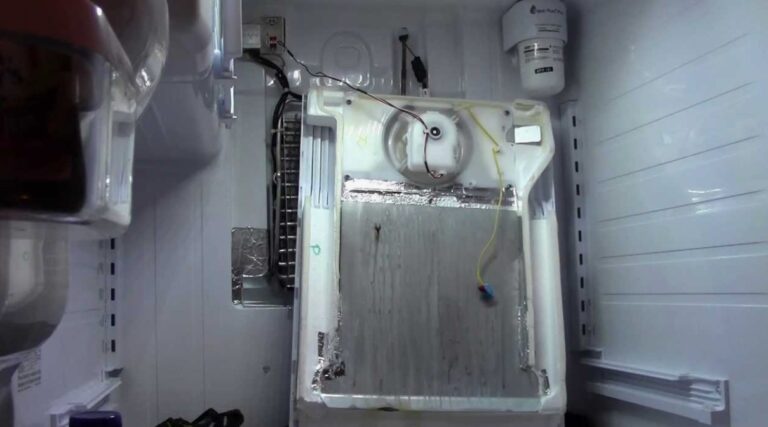
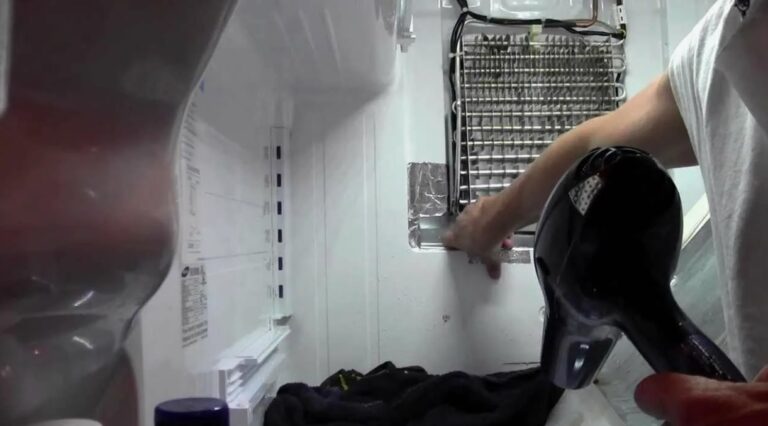
How to Clear a Clogged Defrost Drain
A clogged defrost drain in your Maytag refrigerator can lead to water pooling inside the fridge or freezer, resulting in potential damage and excessive ice buildup. Here’s a step-by-step guide on how to effectively clear the blockage and restore proper function.
Tools and Materials Needed
- Warm water
- Pipe cleaner or flexible wire
- Small bucket or towel
- Vinegar or baking soda (optional)
Step-by-Step Instructions
- Unplug the Refrigerator: Safety first! Disconnect the refrigerator from the power source before starting any repairs.
- Locate the Defrost Drain: Usually found at the back of the freezer section, the defrost drain leads to the drain pan underneath the refrigerator.
- Check for Visible Blockages: Inspect the drain for any visible debris or ice that may be causing the clog.
- Use Warm Water: Slowly pour warm water down the drain to help dissolve any ice or debris blocking the passage. Use a small bucket or towel to catch excess water.
- Clear the Drain with a Pipe Cleaner: If water alone doesn’t clear the clog, insert a pipe cleaner or flexible wire into the drain. Move it back and forth gently to dislodge any remaining blockage.
- Flush with Vinegar or Baking Soda (Optional): For added cleansing, mix vinegar or baking soda with warm water and pour it into the drain to break down any build-up.
- Inspect the Drain Pan: After clearing the drain, check the drain pan under the refrigerator for any accumulated water. Empty it if necessary.
- Reconnect the Power: Once you’ve ensured the drain is clear, plug the refrigerator back in and monitor it for proper operation.
If problems persist after attempting to clear the defrost drain, it may indicate a more serious issue requiring professional assistance. Regular maintenance can prevent clogs in the future, so consider periodically checking the defrost drain for blockages.
Diagnosing Electrical Problems in Maytag Refrigerators
Electrical issues in Maytag refrigerators can lead to improper cooling, unusual noises, or complete breakdowns. Understanding how to diagnose these problems is essential for effective troubleshooting.
Identifying Common Symptoms
The first step in diagnosing electrical problems is to observe the symptoms. Common signs include:
- Inconsistent Temperatures: If your refrigerator is not maintaining a proper temperature, it could be due to electrical component failure.
- Frequent Cycling: An appliance that frequently turns on and off may indicate electrical fluctuations.
- No Power: If the refrigerator does not turn on at all, this might point to an issue with the power source or internal wiring.
Performing Basic Electrical Checks
Once symptoms are identified, follow these steps to diagnose the issue:
- Check the Power Supply: Ensure the refrigerator is plugged in and that the outlet is functioning. Use a multimeter to test for voltage.
- Inspect the Circuit Breaker: Locate your home’s circuit breaker panel and check if any breakers have tripped. Reset any that have, and see if that resolves the problem.
- Examine the Power Cord: Look for signs of damage such as fraying or cuts. A damaged power cord can prevent proper operation.
- Test the Door Switch: Open the refrigerator door and check if the internal light turns on. If not, there may be an issue with the door switch.
If basic checks do not identify the problem, further investigation of internal components may be needed.
For safety, always unplug the refrigerator before inspecting internal electrical components. Common components to inspect include:
- Compressor Start Relay: A faulty relay can prevent the compressor from starting. Test it for continuity.
- Defrost Timer: This component regulates the defrost cycle. A malfunction could affect the cooling system.
- Thermostat: A defective thermostat may not accurately relay temperature readings, leading to operational issues.
By systematically diagnosing electrical issues, you can effectively identify and resolve problems, ensuring your Maytag refrigerator runs smoothly.

Steps to Replace a Faulty Thermostat
Replacing a faulty thermostat in your Maytag refrigerator can enhance its efficiency and longevity. Follow these steps to ensure a successful replacement.
Tools and Materials Needed
- Flathead screwdriver
- Phillips screwdriver
- Replacement thermostat
- Multimeter (for testing)
- Crescent wrench
- Pliers
Replacement Steps
- Unplug the Refrigerator: Ensure the refrigerator is disconnected from the power supply to avoid electrical hazards.
- Remove the Thermostat Cover: Locate the thermostat cover, usually found inside the refrigerator. Use a screwdriver to remove the screws and gently lift off the cover.
- Take a Picture: Before disconnecting wires, take a photo of the existing wiring configuration. This will assist in connecting the new thermostat correctly.
- Disconnect Wires: Carefully detach the wires connected to the old thermostat. Use pliers if necessary to help with stubborn connections.
- Remove the Old Thermostat: Unscrew and take out the faulty thermostat from its mounting bracket.
- Install the New Thermostat: Position the replacement thermostat in the same location and secure it with screws.
- Reconnect Wires: Refer to the photo taken earlier and reconnect the wires to the new thermostat as per the original configuration.
- Replace the Cover: Once all connections are secure, place the thermostat cover back in position and fasten it with screws.
- Plug in the Refrigerator: Reconnect the refrigerator to the power supply and allow it to run for a few hours.
- Test the New Thermostat: Use a multimeter to test the new thermostat’s functionality. Adjust the temperature settings and confirm the refrigerator maintains the selected temperature.
By following these steps, you can effectively replace a faulty thermostat in your Maytag refrigerator and restore its optimal functioning.
Adjusting the Temperature Settings on Your Refrigerator
Maintaining the proper temperature in your Maytag refrigerator is essential for preserving food quality and safety. Ideally, the refrigerator should be set between 35°F and 38°F (1.7°C to 3.3°C) to ensure optimal performance. To adjust the temperature settings, follow these steps.
Locating the Temperature Control
The temperature control is typically located inside the refrigerator compartment, either on the back wall or in the center of the control panel. In some models, it may be a dial, whereas others have a digital display. Familiarize yourself with your specific model by referring to the user manual.
Making the Adjustment
To modify the temperature, turn the dial or press the temperature adjustment buttons on the control panel. If your refrigerator has a digital display, you may need to hold the button for a few seconds to see the current setting. Gradually adjust the temperature to your desired setting, allowing several hours for the refrigerator to stabilize at the new temperature. It’s recommended to wait 24 hours before checking the temperature again with an appliance thermometer to ensure it has reached the appropriate level.
For best results, check the temperature periodically, especially after making adjustments or if the refrigerator has been moved. Keeping your Maytag refrigerator at the correct temperature not only helps in food preservation but also promotes energy efficiency.
How to Repair a Leaky Water Filter
If your Maytag refrigerator’s water filter is leaking, addressing the issue promptly is essential to prevent water damage and ensure proper functionality. Follow these steps to repair or replace the leaky water filter effectively.
Identify the Source of the Leak
Before taking any action, it’s crucial to pinpoint where the leak is occurring. Common sources include:
- Loose connections between the filter and the water line
- Cracks or damage in the water filter itself
- Worn-out O-rings or seals
Steps to Repair the Leak
- Turn Off the Water Supply: Locate the water supply valve connected to your refrigerator and turn it off to prevent further leakage.
- Remove the Water Filter: Twist or pull the filter out carefully, following the manufacturer’s instructions for your specific refrigerator model.
- Inspect the Filter: Check for any visible cracks or damages. If you find any, replacing the filter is necessary.
- Check O-Rings and Seals: Examine the O-rings and seals for wear or damage. If they appear brittle or deformed, replace them.
- Clean Connection Points: Wipe down the connection points with a clean cloth to remove any debris or old sealant that could interfere with a proper seal.
- Reinstall the Filter: If the filter and seals are in good condition, reinsert the filter by aligning it properly and twisting or pushing until it clicks into place.
- Turn On the Water Supply: Open the water supply valve slowly and check for leaks around the filter area. If there’s still leaking, double-check the installation.
- Test the Water Dispensing: Dispense some water to ensure the filter works correctly and that no leaks persist.
If the leak continues after following these steps, consider replacing the filter with a new one and consulting a professional for further assistance.
Identifying and Replacing Worn-Out Condenser Coils
Condenser coils are essential components of your Maytag refrigerator’s cooling system. They dissipate heat absorbed from the refrigerator’s interior, allowing it to function efficiently. Over time, these coils can accumulate dust, dirt, and grime, leading to reduced efficiency and potential failure. Regular maintenance is crucial to prolong the lifespan of your refrigerator.
To identify worn-out condenser coils, first check for signs of overheating. If the exterior of the refrigerator feels excessively warm or the cooling cycles are longer than usual, it may indicate coil issues. Additionally, inspect the coils visually:
- Look for dust, lint, or debris buildup.
- Check for physical damage such as dents or corrosion.
- Evaluate the efficiency; if your fridge is running for extended periods without achieving desired temperatures, the coils may be ineffective.
If you notice these signs, it’s time to clean or replace the condenser coils. Cleaning can often resolve the issue:
- Unplug the refrigerator and locate the condenser coils, typically found at the back or beneath the appliance.
- Use a vacuum cleaner with a brush attachment to gently remove dirt and debris.
- Wipe the coils with a damp cloth if necessary, ensuring they are free from any residue.
If cleaning does not improve performance, replacement may be necessary. Follow these steps to replace the condenser coils:
- Unplug the refrigerator to ensure safety.
- Remove any panels covering the coils.
- Carefully detach the old coils from their mounting brackets.
- Install the new coils by reversing the removal process, ensuring a secure fit.
- Replace any panels and plug the refrigerator back in to test functionality.
Below is a summary table for identifying and handling condenser coil issues:
| Signs of Problems | Action |
|---|---|
| Overheating exterior | Check and clean coils |
| Extended cooling cycles | Inspect and replace coils if necessary |
| Dirt or debris accumulation | Regular cleaning |
| Physical damage to coils | Replace damaged coils |
Regular inspection and maintenance of your Maytag refrigerator’s condenser coils can improve energy efficiency and extend the appliance’s lifespan. Taking prompt action when issues arise will help prevent costly repairs down the line.
How to Reset the Control Panel on Your Refrigerator
Resetting the control panel of your Maytag refrigerator can resolve various issues, such as unresponsive buttons or error codes. Follow these steps to effectively reset the control panel:
| Step | Action |
|---|---|
| 1 | Locate the power cord at the back of the refrigerator. |
| 2 | Unplug the refrigerator from the electrical outlet. |
| 3 | Wait for at least 5 minutes to ensure a complete discharge of power. |
| 4 | Plug the refrigerator back into the electrical outlet. |
| 5 | Observe the control panel; it should reset automatically. |
| 6 | Check if the error codes or unresponsive features are resolved. |
If the control panel does not reset or issues persist, further troubleshooting or professional assistance may be required. Make sure to consult the user manual for specific instructions related to your refrigerator model.
Fixing Ice Maker Issues in Maytag Refrigerators
Ice maker issues can be frustrating, but many problems can be resolved with a few troubleshooting steps. Start by ensuring that your Maytag refrigerator is receiving adequate power. Check the power supply and the outlet by plugging in another appliance to confirm it’s functioning properly.
Common Ice Maker Problems
One of the most frequently encountered problems is the ice maker not producing ice. First, ensure that the ice maker is turned on. Locate the on/off switch and confirm it is in the correct position. Next, examine the water supply line. A kinked or disconnected water line can inhibit water flow to the ice maker. Additionally, inspect the water filter; if it’s clogged or overdue for replacement, it could impede water flow.
Another common issue is the ice maker producing insufficient ice. This could be a result of low water pressure or an improperly set temperature. Make sure the refrigerator is set to the recommended temperature of 0°F (-18°C) for optimal ice production. If the ice maker is still not performing adequately, consider checking the ice sensing arm; it should be free of obstructions and able to move freely.
Troubleshooting Steps
If your ice maker is experiencing freezing issues, clear any ice buildup around the ice mold or the water inlet valve. Defrost the ice maker if necessary, and ensure that the defrost system is functioning correctly. In some cases, the ice mold heater might need to be replaced if it’s malfunctioning, preventing the ice from being released properly.
In the event of a full ice bin but the ice maker has stopped producing, perform a reset. Unplug the refrigerator for about 10 minutes and then plug it back in. Follow up by verifying that the ice maker module is running. If problems persist, inspecting the main control board for any faults could be essential. If you’re not comfortable making these repairs, contacting a professional service technician is recommended.
Steps to Replace a Broken Light Bulb in the Refrigerator
To replace a broken light bulb in your refrigerator, follow these steps for a safe and effective process.
1. Unplug the Refrigerator: Before starting the replacement, unplug the refrigerator to ensure safety. This eliminates any risk of electric shock and allows you to work without interruptions.
2. Locate the Light Bulb: Open the refrigerator door and find the light bulb compartment. This is usually located on the ceiling or side of the interior space. If your model has a cover, gently remove it to access the bulb.
3. Remove the Broken Bulb: Carefully grasp the broken bulb and turn it counterclockwise to unscrew it from the socket. If the bulb is shattered, use gloves to protect your hands from sharp edges. You can also use a pair of needle-nose pliers to help grip and remove the base if needed.
4. Clean the Socket: Before installing the new bulb, check the socket for any debris or broken glass. Use a damp cloth to clean the area, ensuring a proper connection with the new bulb.
5. Install the New Bulb: Take a replacement bulb that matches the wattage and type specified for your refrigerator model. Carefully screw the new bulb into the socket by turning it clockwise until it is secure. Avoid over-tightening to prevent damage.
6. Replace the Cover: If your refrigerator has a light cover, reattach it securely over the bulb. This will protect the bulb from damage and keep the interior tidy.
7. Plug in the Refrigerator: Once you have replaced the bulb and secured any covers, plug the refrigerator back into the power source.
8. Test the Light: Open the refrigerator door to check if the new bulb illuminates properly. If the light stays off, double-check your connections and ensure the bulb is properly installed.
Following these steps will help you efficiently replace a broken light bulb in your refrigerator, restoring light and improving visibility in your appliance.
Maintaining Your Maytag Refrigerator for Longevity
Proper maintenance is crucial for ensuring the longevity and efficiency of your Maytag refrigerator. By following a few simple steps, you can keep your appliance running smoothly and avoid costly repairs.
Regular Cleaning
Cleaning your refrigerator regularly helps prevent dust and debris buildup, which can affect its performance. Focus on the following areas:
- Condenser Coils: Clean the coils at least twice a year to improve efficiency. Use a vacuum cleaner or a coil brush to remove dust and lint.
- Interior Surfaces: Wipe down shelves and bins with a mild detergent to prevent odors and maintain hygiene.
- Door Seals: Check the rubber seals for tears or debris. Clean them with warm, soapy water and ensure they seal properly.
Temperature Management
Maintaining the right temperature is essential for food safety and energy efficiency. Set your refrigerator to:
- Between 35°F and 38°F (1.6°C to 3.3°C) for optimal cooling.
- Check the temperature periodically with an appliance thermometer to ensure it stays consistent.
Avoid opening the door frequently and ensure it closes tightly to maintain internal temperatures.
Regular Inspections
Perform regular checks on your refrigerator’s features:
- Water Filter: Replace the water filter every six months or according to the manufacturer’s recommendations.
- Ice Maker: Check for any blockages or clogs and clear them as needed.
- Drain Pan: Inspect the drain pan for water accumulation. Empty and clean it if necessary.
By following these maintenance tips, your Maytag refrigerator will operate efficiently and have a longer lifespan.
Q&A — Maytag Refrigerator Repair:
What are the common problems that Maytag refrigerators face?
Some frequent issues with Maytag refrigerators include cooling problems, water leaks, ice maker malfunctions, and noisy operation. Cooling problems may arise from a faulty thermostat, while water leaks can result from clogged defrost drains or damaged door seals. Ice maker issues might be caused by a malfunctioning water supply line or a broken ice maker unit. Noise can be attributed to a malfunctioning fan or compressor. Identifying these problems early can help prevent more severe damage.
How can I troubleshoot my Maytag refrigerator if it’s not cooling properly?
If your Maytag refrigerator is not cooling, first check to ensure it is plugged in and that the thermostat is set to the appropriate temperature. Clean the condenser coils, as dust buildup can affect cooling efficiency. Make sure the door seals are intact and not obstructing airflow. If these steps don’t resolve the issue, consider checking the evaporator and condenser fans for functionality. If cooling still does not occur, it may need professional service to assess potential compressor or refrigerant issues.
What maintenance should I perform regularly on my Maytag refrigerator?
Regular maintenance for your Maytag refrigerator includes cleaning the condenser coils at least twice a year to prevent dust buildup, checking and replacing the water filter as needed, and ensuring door seals are clean and effective. Additionally, it’s important to defrost the freezer regularly if it does not have a frost-free feature. Regularly checking the temperature settings and ensuring proper airflow inside the fridge will also help extend its lifespan.
What tools do I need for basic repairs on my Maytag refrigerator?
Basic repairs for your Maytag refrigerator may require a variety of tools, including a screwdriver (both Phillips and flathead), a multimeter for testing electrical components, and pliers. A putty knife can help when working with seals or gaskets, and a vacuum is useful for cleaning condenser coils. If you need to replace parts, always ensure you have the correct replacement components on hand, which may require specific tools depending on the part.
How can I fix my Maytag refrigerator if the ice maker is not working?
If your Maytag refrigerator’s ice maker is not functioning, start by checking the water supply line for any kinks or blockages. Ensure the ice maker is turned on and the freezer temperature is set low enough to produce ice. If it’s still not working, inspect the ice maker module for obstructions or damage and test the water inlet valve for proper operation. If these steps do not help, consider contacting a professional technician for further evaluation or repairs.
What are some common issues with Maytag refrigerators that require repair?
Common issues with Maytag refrigerators include temperature regulation problems, unusual noises, water leaks, and issues with the ice maker. For example, if the refrigerator is not cooling properly, it could be due to a malfunctioning thermostat or a dirty condenser coil. Unusual noises may indicate a failing compressor or a worn-out fan. Water leaks can stem from clogged defrost drains or problems with the door seals. Lastly, if the ice maker is not working, it could be related to a blocked water line or a malfunctioning ice maker assembly.
Don’t let broken appliances disrupt your life — trust expert Appliance Repair services for fast, reliable fixes that get your home back on track today!